Monday, April 13, 2015

Linda's Round Robin all quilted!

Hi, I finally finished Linda's round robin quilt.  I am soooo slow, but to my credit, Linda did tell me there was no hurry and to take my time.  So I did.  I had so much fun quilting this one as it had lots of spaces to add quilting designs.


The center is the piece Linda contributed to the round robin in our Wannabees group.
I added some shapes around those pretty stars instead of just filling it in with one design.  


I did a lot of quilting in those blue swags and bars and you can't see it at all.  Will I ever learn?  It does show on the back (later).


So on the outer blue border I decided to do it in a light blue Glide that shows up a little better.  


I had fun making the feathers alternate with the swags.  I used a tiny baptist fan fill in this part.  Can you see the basket weave in the blue corner square?  (me neither, ha ha)


Here is the entire back, the quilt is about 70 inches square and I did most of my quilting on a Bernina virtuosa 153.

Closer up you can see the stitching on the back in red white and blue.  Most of the threads on the back are Wonderfil Decobob or Invisafil.


Here you can see the quilting in the blue swags and bars.  


This was fun to design, but it was time-consuming.  

Our quilting bee did this round robin over a year ago and I would like us to show these quilts in our guild quilt show in September.  Mine is done and Linda's is almost done (needs binding, sleeve and label). 

This one is mine.  I think round robins are so much fun and so educational.  You have to be willing to get back something that you may not like too much.  But when you get one like mine or Linda's, you can get very excited! Every month you get to work on someone else's quilt and challenge yourself to do something you may not have ever done, or work with colors you would never choose.  

This year we are doing a slice quilt.  See more in August, that's our deadline.  

“Twenty years from now you will be more disappointed by the things that you didn't do than by the ones you did do. So throw off the bowlines. Sail away from the safe harbor. Catch the trade winds in your sails. Explore. Dream. Discover.” 
― H. Jackson Brown Jr.P.S. I Love You


Wednesday, April 1, 2015

I am at the airport on my way home from the Empty Spools Seminar in Pacific Grove California.  Would you like to see some pictures?  Keep going then....
 this is Asilomar, the resort where the conference is held as viewed from the beach on a foggy morning.

this is the studio where I and 14 other women took a dye painting class with Hollis Chatelain.
There were 10 or 11 other teachers at this conference, some with 20 or more students.

I went not knowing anyone, so really lucked out to meet my talented and beautiful roommate, Christina. This pic was taken on our last morning, so we are looking a little frazzled.  We were exhausted.  
Carol made this wonderful painted quilt of her rascally hound, Pistol.  It is a wonderful image of his pitiful look, he knew he was out of bounds.  Look at those eyes...

Jan Ring from Florida painted a beautiful flower.   We all painted three pieces, but I'm just showing some that I was given permission to post about.

Barbara from Florida depicted a photo of her grandson running on the beach, wonderful.

 We all admired Mary's painted image from an old Christmas card that she has held on to for years.


This is my painted fabric piece.  My brother-in-law took this photo with his underwater camera.  Those are bubbles in her nostrils... I will work to depict that with paint or something...
I took advantage of a ride along the 17 mile scenic highway on the Monterey Peninsula and got to ride along with my new Florida friends, Jan and Mary, (Barbara was taking the picture).  We saw beautiful Carmel, Pacific Grove and Pebble Beach.  The coastline was beautiful and the homes and flowers were out of this world.

This conference seemed to me to be for those who are very artistic and creative quilters, or those who are wannabe art quilters - like me!  I was wowed at the work done by all the teachers and students and can't wait to come back.

Wednesday, March 18, 2015

feathered star finish

I finished my faux feathered star.  I found this pattern at the Houston Festival last November and just loved it.  It is raw-edge appliqued.  And then you have lots of space for quilting!

I did tiny pebbles in the first white space...  Then a basket weave around the feather vine.

The border has a free-hand drawn feather vine and a quilted feathered star. This quilt is 30" x 30"


And if you cut carefully, you will have extra pieces to make little wallhangings, potholders, whatevers.... Yes, it took a while to cut this, but doesn't everything worthwhile take some time and effort?

Here's the pattern:Linda Everhart patterns


I missed one beautiful quilt from the Dallas Quilt show yesterday.  
This is "Red Roses for Roberta" by Bobbie Ashley of Pittsburg, TX (formerly of San Antonio)
 There are beautiful little cameos in those circles in the border and on the vase.


Look at the innovative edging and binding...  


"Perfection is not attainable, but if we chase perfection we can catch excellence."  Vince Lombardi

Hope you get some time to create today, Karen


Tuesday, March 17, 2015

Dallas Quilt Show Highlights

Hi, I have been so busy this week.  So now I need to show you what I've been up to.  I entered a few quilts in the Dallas Quilt Show that was this last weekend.   There were some amazing quilts in this show as you will soon see.  But first, lookie lookie...


My Aqua Babes quilt took home an honorable mention in the Quilt Show Theme category, which was funny quilts.


This quilt of my grandson, Alex called Swingin' also got an honorable mention.  This is the first outing for this quilt, glad to see it got a ribbon.


Isn't this quilt amazing?  This is "End of the Spin" by Melissa Sobotka of Richardson, TX.  She was inspired by a rack of old spools she saw in NY.  

"Mr T White Gloves at the Quilt Show" by Judy Kriehn.  This really fits the funny theme of the show, I giggled quite a bit while looking at this one.  It had lots of real bling around his neck.  


This wallhanging was my absolute favorite of the whole show.  Called "Spilling Over" by Sharon Schlotzhauer, it is about the help and sympathy she got when she reported a lost quilt.  


And I just ogled over this silk wallhanging for a long time.  Debbie Geistweidt's "Where Adventures Begin" was inspired by her walks in a 100 acre wood.  


This is "Feathered Frenzy" made by my friend Vickie Owen and quilted by another friend, Karen Nanos.  It's a wonderful, perfectly pieced and quilted work. 


Vickie Owen won an honorable mention for "Stormy Weather" which was beautifully quilted by Danielle Wilkes.

Oh my, Jaynette Huff is such a wonderful quilter.  She lives in Conway, AR which is where my little sister also lives.  So I keep hoping this tenuous connection will rub off on me.  It's called "celtic Visions - Celtic Zoomorphs".  


Love the rock beads she sewed all around, and the hand stitched bias everywhere - wow!

Now for some quilts with inspirational quilting designs.  "Circles Around the Squares" made and quilted by Marie Mitchell.  

Don't you just love her quilting designs?  


Lynn McCartney made and quilted "Hummingbirds in My Garden".  The applique was stupendous, but her quilting was over the top.  


Look at the basket weave... and the tiny feather filler around the hummingbirds, whoa!


Really well done...


This is Good Fortune by Sharry Evans and quilted by Jackie Brown. Take a closer look...


I love it when quilters recreate the design in the quilting.  It is so effective!


This quilt is "Geese at Sunset" by Kathy Risinger and quilted by Dot Collins, another good friend of mine.  Sorry, I didn't get a close-up of Dot's wonderful quilting.  


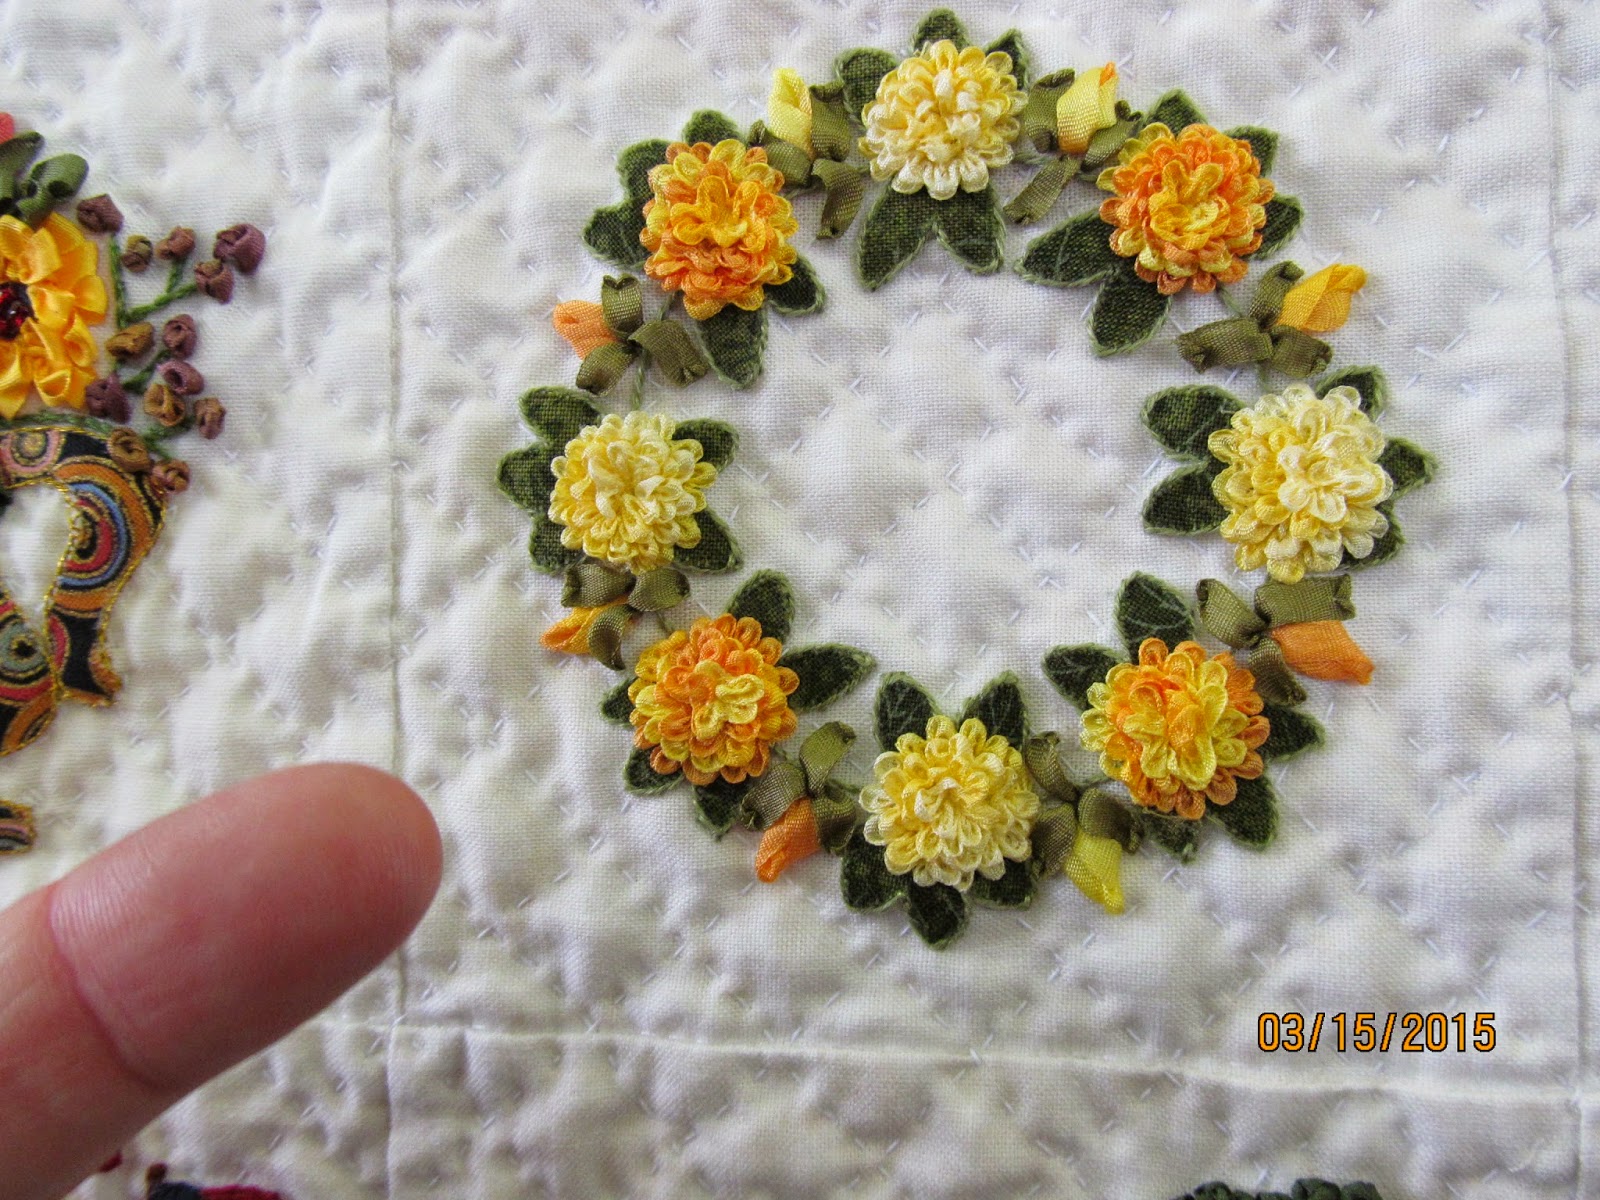
Check out this tiny "Mini Baltimore Album" by Peggy Sympson.  I made my husband put his finger in the photo so you could get a true idea of the size of this amazing wallhanging.


How did she do this??  I think it is ruched silk ribbon.  And look at the hand quilting...  

 "One Cake, Two Cake, Red Cake, Blue Cake" by Linda Neal and quilted by Jackie Brown.  sorry the one above is blurry, but look at Jackie's quilting!! She also quilted "Good Fortune" above.  


The edge treatment is like confetti at a birthday party.  And the applique' is well-done... but the quilting is so creative.  


I love this one too.  

One more that I almost missed.  This is "A Labor of Art" by Sharon Schlotzhauer.  It is about the size of a piece of typing paper.  I've seen photos of this quilt, but I thought it was bed sized.  My husband was taking a break so I couldn't get him to do the finger thing, but you can use the ribbon to get the scope of the tiny quilt.  


It is painted and intricately quilted.  so beautiful...

I hope you enjoyed some of my favorites from this quilt show.  I better buckle down now and get to work on my own stuff.  I have to teach a beginner fmq class tomorrow.  Then next week I will be taking a class from Hollis Chatelain at Asilomar, woo hoo.  I will fill you in on my accomplishments (and failures) there.  


"People who think they know everything are a great annoyance to those of us who do."  Isaac Asimov

Get your butt up and do some quilting today, Karen


Saturday, March 7, 2015

Alamo quilt is finished!

Well the Alamo quilt is finished and it is going on the auction block today.  I can't wait to see how much it goes for.  It was made by Linda and her daughters for a local charity auction with the proceeds going to St. Jude's Children's Hospital.

 I quilted it with a layer of cotton batting and a full layer of Dream wool on top of the cotton. Honestly, I probably won't do that again, the full layer of wool made the quilt nice and puffy, but it was wont to pucker.  I had to fight it to make it smooth.  In future, I will use half a layer of wool as that adds the puffiness, but isn't so thick.

 I quilted this on my Bernina 153, an older model that is my workhorse.  The Powerquilter was being repaired after I overtightened the tension knob.


Here is the quilt after it was blocked.  To block it, I put it in the washer on rinse and spin - I know scary!!  But I needed to rinse off the pounce and blue line marker.  Then I pinned it to my design wall (wet) and stretched it using a tape measure to make it square, pinning as I stretched.  I put a fan on it and let it blow overnight.  The next morning I unpinned it and it was flat and square.   


On those black triangles, I couldn't decide on feathers or curved cross-hatching (I mean, I really lost sleep over this decision), so finally I did both!  It is quilted with a variegated thread to really show up.  And I love the cobblestones... I used a technique from this tutorial: The inbox Jaunt
I also used a version of the bricks to make the rounded rocks on the Alamo.


I did make that lasso around the boot; I drew it freehand and did some rope quilting on the lasso. 

 And then I used my new ruler Linda Mae's rays to make the spiral rays.  This same ruler made the straight rays on the Alamo.  I love this ruler.  I had to use it for marking, but I have a ruler foot on order for my Powerquilter that will allow me to use this ruler like a longarm quilter would.  Hopefully....


Here is a photo of the barb wire fence along the border using a stencil that I have had forever and never used.  It was tricky, lots of backtracking, but I love the look.  


Here I am on the left with my shortie friend Linda (just kidding Linda :)

I think she was very pleased, especially since I bound it for her too.  
I hope you get to do some quilting this weekend.  Remember, 

"A day patched with quilting seldom unravels."  Karen